Sunday, August 31st, 2008

Saturday, August 30th, 2008

Wednesday, August 27th, 2008

Blog Posts

GTD with OmniFocus

After three years of life changing organizational goodness, I migrated my plain-text-based GTD system to OmniFocus.

My text list system has not been the most efficient implementation. I decided it was time for a standalone application. After reading this GTD application comparison and watching a screencast about OmniFocus I decided to download the trial and give it a shot.

OmniFocus is a slick application. Thanks to its Cocoa goodness, it integrates perfectly with OS X. It has an easy-to-use interface, but its plethora of features takes some getting used to.

The hardest part was manually importing my several hundred tasks and projects. I had to copy and paste these one by one. It would be a nice feature if OmniFocus could parse plain text files and import each line as a task.

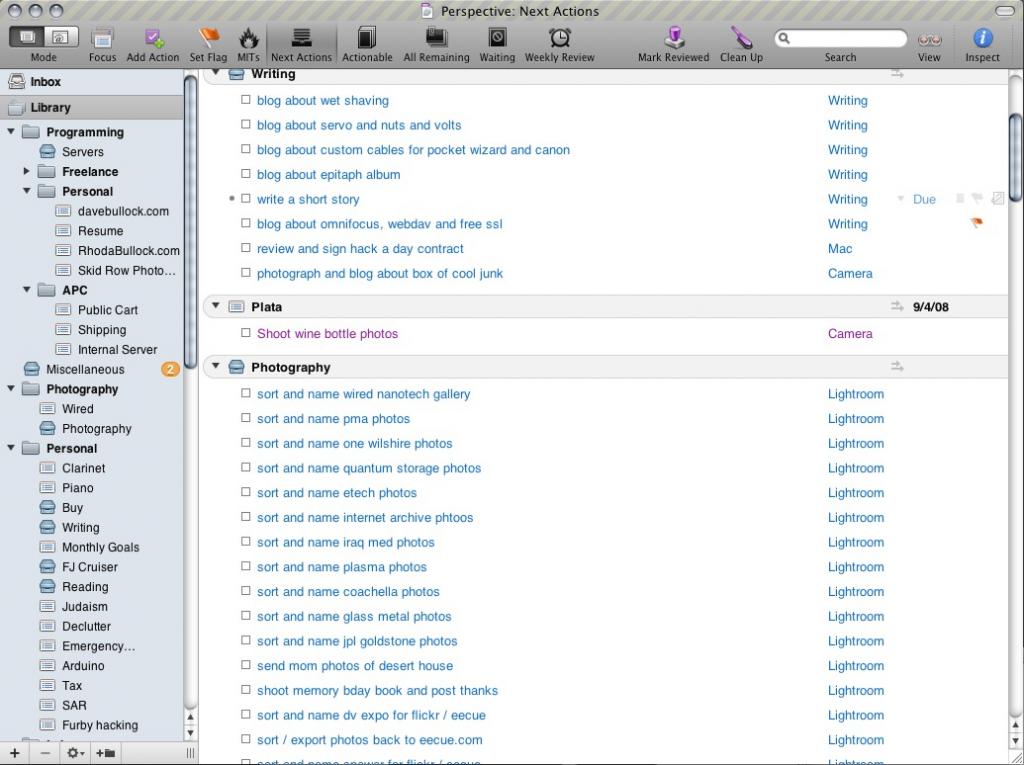
Once my tasks were imported I created projects and folders as you can see in the screenshot below. I then created contexts, some of which you can see in the right hand column of the screenshot.

When I was using my text lists I didn't fully utilize contexts properly, but OmniFocus makes them easy to implement. You can switch to Context mode, select a context like "Office" and see all the tasks that can be done in your office.

OmniFocus has a nice feature called Perspectives, where you can save a predetermined view of your tasks. I have one which I use to implement Zen Habits MITs (Most Important Tasks). Every night before I go to bed I review my Next Actions perspective and flag the tasks I want to complete the next day. The MITs perspective shows my flagged items, which I then (in theory) do.

I also have the iPhone app installed. It's not cheap: $20, but it works fairly well apart from the syncing speed. It takes a very long time (5-10 minutes) to sync changes over the EDGE network, which basically make it close to useless for quick entry. If I know I'm going to be using is I can let it sync for a few minutes.

OmniFocus is supposed to sync to a WebDAV server, but it fails on my FreeBSD server running Apache 2.2.3. I am forced to sync using Apple's buggy Mobile Me. I hope they fix the WebDAV sync issues before my Mobile Me free trial runs out!

OmniFocus: The Good

  • Feature rich GTD management.
  • Contexts rock for doing what you can, where you can.
  • Perspectives make reviewing, viewing and doing fun and easy.
  • Simple, system-wide quick-entry is only a keystroke away.
  • Due-dates and start-dates make planning and remember tasks easier.
  • Automated email parsing pulls tasks from Jott and other email based note taking systems.
  • SneakyPeak version with syncing is still in beta and thus is free.

OmniFocus: The Bad

  • WebDAV export and syncing is broken.
  • Syncing to iPhone app over EDGE takes over 5 minutes, making the app nearly worthless for quick entry.
  • iPhone app is expensive: $20
  • Desktop app is even more expensive: $80 ($120 for family pack)

Despite the imperfections and relatively high price, I really like OmniFocus. As soon as they fix the syncing (or they stop extending the free trial) I will be purchasing a license.

GTD with OmniFocus

Read more...

Monday, August 25th, 2008

Blog Posts

San Gorgonio: Backpacking Fun Up Fish Creek

This weekend my wonderful, beautiful backpacking wife Penelope and I hiked to the peak of the tallest mountain in Southern California: San Gorgonio.

We have been training every weekend for this backpacking trip by taking nice long day hikes. The difference between our day hikes and the San Gorgonio summit was its 24 mile length compared to the 6 mile trips and of course the fact that we were carrying heavy packs.

We started out early Friday morning and drove up the 38 and then seven miles on a dirt road. This road took us to the Fish Creek trailhead where we parked and started our ascent.

The trail was beautiful and green with a nice gentle climb of about 1,800 feet in six miles. We didn't see another person the whole day we were hiking. Fish Creek trail is definitely less crowded than the other routes to the top.

Once we got to Mine Shaft Saddle we headed down to our campsite at Mine Shaft Flat about a mile and 600 vertical feet downhill. We set up camp and cooked up some dinner, which was quite good despite consisting of various types of ramen noodles and a package of spicy salmon.

The next morning we headed about a half-mile down the trail towards Big Tree camp to fill our water bottles. The water was flowing nicely and was icy cold and fresh. We filled up our containers and then used an MSR MIOX to purify the water.

What I failed to notice was that the test strips which detect the level of chlorine ions made by the MIOX were expired by two years. This caused us to keep adding the MIOX solution and our water tasted like it was fresh from a pool. It ended up being ok to drink, but not the most pleasant experience. Better than being dehydrated or getting Giardia!

The next morning we ate breakfast, broke down camp and headed up to the trailhead where Fish Creek trail intersects with the trail to the summit: Sky High View trail. Once at the intersection we unloaded our packs and stashed our gear, bringing only food, water, first aid and emergency supplies, my ham radio and the SPOT messenger.

The SPOT was nice to have, it allowed us to send our family our position throughout our trip. If there was an emergency we could have also used it to ask for help of request a rescue.

Once we had unloaded our packs, the four and a half mile 3,500' elevation gain hike was actually pretty easy. We made it up in roughly two hours despite Penelope feeling a little tired at the end, probably from low blood sugar.

At the peak we rested, took some photos and ate lunch. We chatted with some boy scouts and their troop leader. I then made contact with someone in Huntington Beach via the Catalina amateur radio repeater.

We also met a nice Israeli astrophysicist named Amri Wandel. Amri happened to be in the LA area teaching a class at UCLA called "Astrophysics and life in the Universe." He hiked down with us and we had a very interesting conversation about Black Holes, Quasars, Pulsars, Unified Field Theory and much more. He has some interesting papers about to come out that I will likely cover for Wired.com.

On the way down we made good time, only stopping once to grab our stashed gear. We made it down the mountain in about four and a half hours from the peak to the trail head. In all we hiked 17 miles on Saturday and about 24 miles total.

We had a great time and we are looking forward to backpacking again soon. We plan on bagging Mount Whitney around this time next year and Half Dome some time before that.

San Jacinto as seen from San Gorgonio Pe

San Jacinto stands tall in the distance as seen from San Gorgonio peak at 11,500 feet last Saturday.

Read more...

Friday, August 22nd, 2008

Photos

Tuesday, August 19th, 2008

Blog Posts

Gaviota Peak

Last weekend my lovely wife Penelope and I hiked to the top of Gaviota Peak. We have been training for a backpacking trip this coming weekend to the top of Southern California's tallest mountain: San Gorgonio.

Gaviota Peak is located about 20 minutes north of Santa Barbara a few miles in from the coast. The trail is fairly popular, but most people opt to hit the hot springs instead of hiking to the peak. The springs are less than a mile from the trailhead.

We started our hike in the early afternoon and made it to the top in under 2 hours. The trail is an old fire road in mediocre condition. The hike takes your from about 300 feet above sea-level to 2,458 feet.

I decided to bring my camera gear and tripod to shoot some panoramas at the peak. You can see one frame of the panorama below. Unfortunately the sky was quite hazy so you can't see very far. Ideally I would like to do this hike again after a good rain.

The hike was strenuous, but the enjoyable. I look forward to doing it again some time soon. I am excited about our San Gorgonio backpacking trip this weekend.

Dave and Penelope on Gaviota Peak

My wife and I stand on top of Gaviota Peak near Santa Barbara last Sunday after a nice 3 mile hike with over 2000' of elevation gain.

Read more...

Monday, August 18th, 2008

Blog Posts

My New Clarinet: Selmer CL-200

Recently I picked up a new-to-me Selmer CL-200 clarinet. I love the warm sound it produces thanks to its all-wood construction. I have been practicing every day and enjoying it greatly.

I started playing clarinet in elementary school and played it through middle school. Sadly I stopped playing in high school, perhaps having to do with not wanting to be a band geek. A few years ago I bought a cheap plastic clarinet which I played once and put away.

Several weeks ago I had an urge to play again so I pulled my old clarinet out of storage and started practicing again. Surprisingly I hadn't completely forgotten my old skills and within a few days I was reading and playing music again.

I found a cool site created by a klezmer band in Manchester that had tons of klezmer PDF sheet music and MIDI files to download. I downloaded and printed every single song on their site and choose about a dozen to start practicing.

After deciding I really wanted to get into playing clarinet again, I started to yearn for a better instrument. When I played in junior high I had a nice old wood clarinet. It had beautiful tone and the grain was lovely.

I started to look around for a good deal on a nicely serviced wood clarinet online. I ended up finding the Clarinet Closet. The Clarinet Closet services used clarinets and sells them at a reasonable price. I certainly could have found a cheaper clarinet on ebay, but I wanted to buy from someone who actually spent the time to service and play the clarinet.

I opted for the cheapest wood clarinet they had for sale, a Selmer CL-200. It set me back about $260 plus shipping. I paid via paypal and the clarinet arrived in the mail just 2 days later. It's amazing that you can ship something through the USPS and it arrives twice as fast compared to UPS for half the price.

I love the clarinet. The SL-200 has a beautiful tone and feels great, especially for a student level / intermediate instrument. At some point I may upgrade to a higher level clarinet, but the CL-200 will suit me perfectly for some time.

Once I master a few dozen klezmer tunes I'm going to look for a violinist, organist and perhaps a DJ / producer to start a modern klezmer dubstep / drum'n'bass group. That should be interesting!

Selmer CL-200 Wood Clarinet

A close-up of the bell of my new wood clarinet shows the Selmer logo.

Read more...

Saturday, August 16th, 2008

Photos

Thursday, August 14th, 2008

Tuesday, August 12th, 2008

Blog Posts

Defcon 16 Wrap-up

Last weekend I covered Defcon 16, the world's largest hacker convention for Wired.com's Threat Level blog. Like last year, I was paired with Kim Zetter, one of Wired's best writers and an all around cool person.

Zetter wrote all the serious articles, which I provided pictures for. These articles included:

I did end up writing a few features that weren't hard news, but were still fun to write and shoot:

The Defcon NOC piece ended up on the front page of Slashdot, Gizmodo, Hack A Day, BoingBoing and more. Some of the other pieces I wrote also got picked up on various other sites.

I had a great time this year at Defcon, it was my 8th Defcon and I can't wait for next year. I'm looking forward to working with Zetter again and getting another tour of the NOC!

Defcon 16 NOC Tour on Wired.com

Wired.com piece in which I toured the Defcon Network Operations Center.

Read more...

Thursday, August 7th, 2008

Blog Posts

Defcon Supplies

I have arrived in Las Vegas for Defcon and Black Hat (not in that order). I love Defcon. I believe this will be my 8th year at the 'con. I've been covering it for Wired since last year and for my own blog the year before.

I also posted a sneak peek of the Defcon 16 badge on Wired.com earlier this week. I can't wait to get my hands on a production version.

My Defcon Supplies

A nice selection of supplies covers my bed including 8 SD cards (for friends), IR LEDs, a soldering station, a bare bones arduino, a breadboard, various components and Maker's Mark.

Read more...

Tuesday, August 5th, 2008

Photos

Monday, August 4th, 2008

Blog Posts

Hike: Echo Mountain, White City, Mt. Lowe Railway Ruins

This weekend my lovely wife Penelope and I hiked up to the ruins of the White City Resort on Echo Mountain.

The hike is nice and short, a little over five miles round trip. The trail is mostly unshaded and gains about 1,500 feet of elevation on the way up. We didn't get going until around 11:00 a.m. at which time it was quite warm.

Once we made it to the top the hard work was totally worth it. The Mount Lowe Railway was once an amazing railway built to service 3 small resorts. It ended up being plagued by various disasters and shutting down around World War II.

The ruins on top are quite interesting and include foundations, a cistern (see below) and the remains of the cable wheel and part of a train. If you like ruins and deserted places you will enjoy this hike.

We plan on returning, but in cooler weather and heading to the top of Mt. Lowe, which is another 3 miles past White City. If you go on this hike, bring plenty of water!

Penelope at the Mt. Lowe Pool

Penelope stands on the edge of the Echo Mountain House's cistern after hiking for a bit over an hour.

Click here to see more photos from our Mt. Lowe / White City hike.

Read more...

Saturday, August 2nd, 2008

Blog Posts

Programming the Adruino and TLC5940 for LED Fun

Recently I wrote my first Arduino program to fade LEDs. Arduino is an open source electronics platform designed to be easy to use by "artists, designers, hobbyists, and anyone interested in creating interactive objects or environments." Basically it's a microcontroller that can be easily programmed to do fun things.

I am using a low cost clone called a Bare Bones Arduino. One of the best parts about the Bard-Bones Arduino clone is that it comes in a kit. Soldering stuff together is fun!

Previously I wrote about my adventures with a BASIC Stamp. The Arduino is very similar to a BASIC Stamp, but uses the C programming language instead of BASIC. This makes it more powerful and extensible.

In the past I had only written one program in C to control some serial port extenders. Writing in C for this Arduino project was a lot of fun and it showed me how similar C is to PHP, which I have been writing extensively for over 10 years.

The program I wrote was based on some code from Peter Mackey at Pixelriot. I changed it up a bit so I could control the LEDs fading on an individual basis. I then made it do a Knight Rider fade (see video below). Here is a link to my version of the Arduino 5940 code.

A short video showing pulsing LEDs triggered by an Arduino controlling the TLC5940 chip.

The code controls a Texas Instruments TLC5940 chip. The TLC5940 is an LED controller that can fade up to 16 LEDs to over 4,000 levels of brightness. You can chain the chips together to control around 400 total LEDs.

This first program is actually a proof of concept for a project I'm working on. I can't really talk too much about the project, but it will involve a whole mess of LEDs and an old school public art installation.

Currently I'm working on a new Arduino project that is a multipurpose long exposure, intervalometer and sound and light trigger for Canon cameras. I'll post more about that when it's done.

I'm really enjoying both writing in C and playing with electronics. Microcontollers are awesome.

Bare Bones Arduino and TLC5940 On Breadboard

This Bare-Bones Arduino clone connected to a breadboard is controlling a Texas Instruments TLC5940 LED controller which in turn is pulsing the LEDs

Read more...

Thursday, July 31st, 2008

Blog Posts

Tuesday, July 29th, 2008

Blog Posts

SAR: Highline Training

Two weeks ago my Search and Rescue team practiced a highly complicated technique known as a highline during our training at Deep Creek. Basically a highline is a rope across a canyon on which a litter and attendant can move both vertically and horizontally.

We started the day by lugging the huge amount of gear a highline requires to our destination. This gear included over a thousand feet of rope, over 50 pounds of hardware, rock protection, webbing, the litter and our personal packs.

This training was different from our usual highline training because one of our teammates was shooting photos on rope. We rigged a separate system for him about 10 feet above the highline so he could get a good angle.

The first part of rigging the highline was getting the rope across the gap. To do this we employed a giant slingshot that we used to launch a little buckshot filled bag. The bag is connected to a high strength kevlar thread. Once this is across we attached it to a heave line which we attached to the thread. We then reeled it back in using fishing pole. That line was then attached to the ropes which we sent back and attached to an anchor.

Once we had the track line rigged we rigged another line through a pulley at the far anchor. Then brought it back to a very large pulley called a kootenay which is where the litter hung from. This line was used to pull the litter out away from the haul team.

Another line was attached to the other side of the kootenay to pull it back towards the haul team. Finally one very long line was connected through the kootenay and down to the litter on a pulley. This line was the reave line and was be used to raise and lower the litter.

As you can probably tell this was a complicated system. It saw strength levels not normally seen in a standard rescue system so certain special features like high-strength tie-offs were used. High strength tie-offs use two prussiks (basically loops or rope wrapped around a larger rope) to increase the strength of anchor point tie ins.

Running the system was also non-trivial as the haul team had to respond to commands other than just up down and stop. They also had to to move the patient and attendant horizontally.

At the end of the day we actually did a great job of rigging everything and got set up in a reasonable amount of time. Especially considering that we also needed to rig a separate system for our photographer.

Kinsey Hanging

Hanging from a highline Mark Kinsey works as a litter attendant during a training session for the San Bernardino Sheriff's Cave Rescue Team

More photos after the jump...

Read more...

Photos

Monday, July 28th, 2008

Blog Posts

Saturday, July 26th, 2008

Friday, July 18th, 2008

Photos

Wednesday, July 16th, 2008

Blog Posts

Skid Row Photography Club

Recently I have been participating in the Skid Row Photography Club (SRPC). When I was part of the Downtown Los Angeles Neighborhood Council (DLANC) I requested funding for club which Michael Blaze started. DLANC ended up putting in $2,000.

Per the funding proposal I submitted, half of that money was to go towards purchasing cameras. We ended up buying six Fujifilm Finepix Z20FD digital cameras and six 2GB cards.

The 10 megapixel cameras remain property of DLANC, but each were assigned to a member of the SRPC. So far the participants have been very happy with their cameras. I have been ecstatic with the resulting images.

After a few more months of shooting, I will be curating a gallery show with prints from each member. We have another $1,000 in the budget to matte and frame the work. Any income from the sale of the photos will be split between the SRPC and the photographer.

It is inspiring to see the participants enthusiastically embrace photography. Each member of the club has their own style and interests. I am very excited about the upcoming show and this great group of photographers.

The Skid Row Photography Club meets every Tuesday at 3:00 p.m. in the UUCEP lounge on the corner of 6th and Stanford in Downtown Los Angeles. Everyone is welcome, no camera required.

Note: The Skid Row Photography Club is seeking funding and donations for more camera and computer equipment. We are also looking for a gallery or other venue to display the work during an upcoming Downtown Art Walk. If you know anyone how would be interested in helping, please let me know.

Skid Row Photography Club

Members of the Skid Row Photography Club pose for a group shot in the UCEPP lounge in Downtown Los Angeles.

Read more...

Tuesday, July 15th, 2008

Monday, July 14th, 2008

Blog Posts

Cave of The Winding Stair

Recently I took a trip that included 300 feet of rappels to the bottom of Cave of The Winding Stair. My Search and Rescue Team specializes in Cave Rescue. Every few months we do our best to train in-cave.

Last month we headed out to the Providence Mountains in the Mojave National Preserve. After camping overnight, we met up with some folks for the Barstow Mine Rescue Team for our joint in-cave-familiarization training (video of our previous joint training, in-mine). We then made our way on a relatively rough 4WD trail to the cave parking lot.

Being that we were doing a rescue scenario, we had to hump a good deal of gear. The trail is less than a mile long, but up the whole way. I prefer walking up-trail before caving. Walking up-trail caving is no fun.

Once inside the cave we split into two groups. The first group, which I was part of, was comprised of people who had never been in Cave of the Winding Stair. Our goal was to rappel down to the bottom and ascend back up while the second team prepared the rigging for the rescue scenario.

John Norman led our group, having been in the cave many times. He rigged each of the 3 drops and we rappelled down after him. The final drop was a 130 foot free hanging rappel. Fun!

We made it to the bottom of the last rappel in roughly two hours. Once there we climbed down to the lowest point of the cave and signed the register. After climbing back up to the main room we rested, snacked and then begun our ascent.

Rappelling is easy, you just go down the rope. Ascending is hard work. I use the Frog System which works well for tight squeezes and passing knots and rebelays. It's a real workout going straight up a rope, and even more challenging to go over an edge or through a squeeze. Either way, though, it was good fun.

As you can see in the photo below, I was wearing shorts. I probably should have worn pants as the rope ended up giving me an abrasion on my leg that made the final ascents painful.

Once we were back at the top of the cave in a section called "The Office", the second group had finished rigging the rescue scenario. To make things a bit more... interesting, we had two photographers from the Sheriff's department with us. We rigged a separate system for them which included an interesting winch-like device called a paillardet. The paillardet is great for raising and lowering a single-person load, but it weighs a ton.

We ran the rescue scenario successfully, pulling our mock patient, a litter attendant and both photographers out of the cave. Unfortunately I didn't get a free ride out!

Caving is great fun and I highly recommend it as long as your aren't afraid of tight spaces, the dark, spiders, bats, heights, exposure or getting dirty.

Me in Cave of the Winding Stair

This photo taken by my teammate Jen Hopper shows me hanging at the bottom of a 130 foot rappel in Cave of the Winding Stair.

Read more...

Saturday, July 12th, 2008

Blog Posts

Thursday, July 10th, 2008

Wednesday, July 9th, 2008

Photos

Tuesday, July 8th, 2008

Blog Posts

Mount Agassiz: From Sea Level to 14,000 Feet

Yesterday I climbed a roughly 14,000 foot tall mountain in search of a missing hiker. As I've mentioned previously I am a Search and Rescue volunteer. The mission yesterday was my most physically demanding search so far.

It all started out on Sunday when I got a call-out for a mutual-aid search near Bishop, Calif. I put down my homemade wood-fired pizza and responded that I would be there in the morning.

Because Bishop is roughly 5 hours from Downtown Los Angeles I had to be up at 3:00 a.m. and on the road by 4:00. I threw my winter alpine, cave and 24-hour gear in the FJ and headed out to the San Bernardino County Sheriff's Office/Jail where we store our trucks and team gear.

At the SO I met up with John Norman and Mark Kinsey and we promptly hit the road to Bishop. Four hours later we were in Bishop and were given details about the missing hiker we would be searching for. We then proceeded to hurry up and wait (standard SAR operating procedure) for an assignment.

Finally around noon Kinsey and I were tasked with ascending Mount Agassiz to check the summit registry. The missing hiker always signed registries. If we didn't find his signature in the log we would effectively be narrowing the search area.

The Forest Service was running helicopter transport to our insertion point. They requested that we don Nomex flight suits as a precautionary measure, one which we've never had to do before. Once in our suits they dropped Kinsey and I off one at a time in Bishop Pass.

Bishop Pass is at an elevation of roughly 12,000 feet. Just a few hours earlier we had been at sea level. To say we didn't have much time to acclimate to the altitude would be a slight understatement.

We began our ascent of the western face of Mount Agassiz at 1:00 p.m. On the map and as the crow flies, the distance from the base to the peak is only about a kilometer. Of course that doesn't include the 2,000 vertical feet included in the walk up.

2,000 vertical feet in under a mile wouldn't be too bad if there was a nice trail up. Mount Agassiz has no trail, and every step of the way is on top of loose boulders ranging in size from gravel to VW Bus.

We made our way to the top in a little under 3 hours carrying 35 pound packs. The thin air had us stopping frequently to catch our breath. The loose rock made the ascent unnerving, especially when stepping on a large boulder caused it to shift.

Once we were at the summit we took photos of the register, snacked and then radioed in to the Command Post. They informed us that if we wanted a helicopter extraction we would need to be back down to the Landing Zone by 6:00 p.m. We radioed back our concern that we may need to push it to 6:30 or later. They told us that 6:30 was the latest we could be extracted.

We started on the descent, thinking that it would be faster on the way down. As it turned out it, scrambling down the loose boulders was more difficult than climbing up. When you step up on a giant boulder and it starts to move, you can simply unweight it. When you step down on a boulder and it moves you have already committed yourself and you can't just jump backwards uphill.

At one point I stepped onto a boulder the size of a refrigerator and it slid about 3 feet down the mountain. I surfed it until it stopped and quickly hopped to the side. That was interesting.

About half way down we called in to base and asked if there was any way we could be extracted later than 6:30. They said no. We decided to pick up the pace.

We ended up making it back to the landing zone right around 6:45. Lucky for us, the helicopter was running late. We threw on our Nomes flight suits just in time to catch a ride down the mountain.

Inyo Country SAR treated Kinsey and I to a nice dinner in Bishop and then we drove back to San Bernardino. I ended up getting home at roughly 3:00 a.m.

The mission was extremely taxing physically. Ideally we would have started our ascent closer to 9:00 a.m. Either way it was a great mission, although unfortunately we did not find the missing hiker. Hopefully he is ok and will be found safe and sound.

Update: Here area few articles about the search.

Update 2: Unfortunately DeVan did not make it. His body was discovered today.

The View from Mt. Agassiz

The view from Mount Agassiz as seen on July 7th during a search for a missing hiker.

More photos after the fold...

Read more...

Friday, July 4th, 2008

Blog Posts

Our Great Independence

Our forefathers fought for our enduring yet oft threatened freedom for which we celebrate today. Amid the barbecued beef and the glowing fireworks we seldom think about the sacrifices good men made to create this glorious country. Instead of writing a long post today I quote directly from the great Declaration of Independence which put into words the sovereignty of our beloved nation.

When in the Course of human events, it becomes necessary for one people to dissolve the political bands which have connected them with another, and to assume among the powers of the earth, the separate and equal station to which the Laws of Nature and of Nature's God entitle them, a decent respect to the opinions of mankind requires that they should declare the causes which impel them to the separation.

We hold these truths to be self-evident, that all men are created equal, that they are endowed by their Creator with certain unalienable Rights, that among these are Life, Liberty and the pursuit of Happiness.

That to secure these rights, Governments are instituted among Men, deriving their just powers from the consent of the governed, That whenever any Form of Government becomes destructive of these ends, it is the Right of the People to alter or to abolish it, and to institute new Government, laying its foundation on such principles and organizing its powers in such form, as to them shall seem most likely to effect their Safety and Happiness.

Prudence, indeed, will dictate that Governments long established should not be changed for light and transient causes; and accordingly all experience hath shewn, that mankind are more disposed to suffer, while evils are sufferable, than to right themselves by abolishing the forms to which they are accustomed. But when a long train of abuses and usurpations, pursuing invariably the same Object evinces a design to reduce them under absolute Despotism, it is their right, it is their duty, to throw off such Government, and to provide new Guards for their future security.

fireworks

A series of small fireworks light up the night during an Independence Day celebration in Compton from this file photo I shot in 2006.

Read more...

Thursday, July 3rd, 2008

Blog Posts

Losing Weight the High-Tech Way

In the past five months I've lost over 30 pounds. I haven't been doing any strange diet or taking any weight-loss drugs. I am doing it the old fashion way, eating less and moving more. I have employed technology to help me reach my goal.

It's not hard to figure out that if you eat more food than your body can metabolize you will gain weight. The hard part is not eating more than you need. I am using an application called DietController to keep track of my caloric intake.

DietController has a fairly complete database of nutritional information including nearly all fast-food (of which I eat very little), packaged food and basic meal components. After every meal I enter in what I've eaten and it lets me know how much more I can eat and still be within my diet plan.

When you set up DietController, you tell it your height, age, weight and basic activity level. You then set how much you want to weigh by when. I chose 195 pounds by February 2009, which will just take me out of the overweight range. DietController then tells you how many less calories than you daily caloric rate you need to eat every day to reach your goal. For me it is 700 less calories per day.

Along with the eating less part, I have also been exercising almost every day. My sister-in-law recommended the Polar F11 which I picked up from Amazon. The F11 tracks your workout by testing your heart rate before each session. I actually disabled this feature and just set my age, weight and maximum heart-rate which I ascertained after a long sprint. Right now it has me working out six days a week, of which I normally do at least four.

For my workouts I started out walking. This worked well at first, but it started to get hard to get up to my target heart rate. Later I began jogging in place at home. A few weeks ago I started running with my lovely wife. Today I ran four miles and it felt great.

Every morning and night I weigh myself on a digital scale which I enter into DietController (see my night weight vs. diet plan chart below). Of course I always weigh less in the morning, but I like keeping track of both weights. The graph doesn't show the first few months of my diet as I didn't have a scale, but I know I weighed 268 when I went to the doctor in January.

After losing 30 pounds I feel great. I still have over 40 more to go, but it's just a matter of time until I meet my goal. Technology has played a big part in my weight loss, but my biggest backer has been my wife who has supported me every step of the way. Thanks Penelope, you're the best!

My Weight Chart from Diet Controller

A screen-grab of my weight vs. diet plan chart from Diet Controller.

Read more...

Photos

Wednesday, July 2nd, 2008

Blog Posts

SpamAssassin: Filtering Spam is a Good Thing

I installed SpamAssassin on my mail server. Previously I had just relied on Mail.app's spam filtering functionality to deal with the hundreds of junk messages I receive daily. Now vpopmail sends every message through SpamAssassin which has been extremely effective in filtering the incoming crap.

Relying on your email application to filter spam works well as long as always keep it running. I take my laptop to work with me so I frequently don't have Mail.app running. This causes spam to pile up and makes it a hassle to check email using my iPhone.

Now SpamAssasin and vpopmail automatically move spam from my Inbox into my Junk folder. When I check my mail on the go I am no longer greeted with a bunch of junk.

My users are also benefitting from the install. They have given me positive feedback on SA's management of their spam. Nobody likes dealing with junk mail so anything that makes the process easier is always welcome.

I have noticed that SA doesn't catch everything and sometimes falsely thinks some good email is spam. I update the rule signatures nightly which helps. Soon I am going to implement a spam/ham folder heuristic update script. This will automatically train SA just by moving incorrectly filtered email into one of two folders.

SpamAssassin is a great addition to my mail toolkit. I am very pleased with the results so far and I am eager to help it do a better job. Thanks SpamAssasin!

just mutton

Cans of Just Mutton sit ready for the buying on a grocery store shelf in Fiji during my honeymoon in 2006.

Read more...

Tuesday, July 1st, 2008

Blog Posts

Cacti: Qmail and Djbdns Graphing Templates

Recently I created two templates for Cacti, the open source server resource graphing application. I have been using Cacti for years, but there were a few things that I was not able to find graphing solutions for.

Qmail is an open source, light-weight and secure email server written by Dan Bernstein. I have also been using qmail for years, but until recently I had no way of graphing its traffic. I found this helpful bit of code on Howie's Stuff which helped me get the raw data I needed from qmailmrtg. After I got that working I started out with this template, which mostly worked. I then created a complex graph and exported the template for it which I posted here. The results can be seen in the graph below.

Cacti Qmail Graph

A Cacti/rrdtool graph showing various information about a qmail server that I run.

The next service that I was unable to find a Cacti graphing solution for was djbdns. Djbdns is a lightweight and secure DNS daemon, also written by Dan Bernstein. Jeremey Kister wrote a great script called djbdns-stats for parsing the djbdns logs and presenting data in the perfect format for Cacti to undertand. I took the djbdns-stats output and created an input and graph (below) template for Cacti, which I then shared on the Cacti site.

Cacti Tinydns Graph

A Cacti/rrdtool graph showing dns usage on my djbdns server.

I have found Cacti to be an extremely useful application over the years. I am greatly looking forward to the next release which will incorporate the helpful Cactiusers plugin framework.

Read more...

Monday, June 30th, 2008

Blog Posts

The Running of the Bullocks

Recently I have started running again. My wife has always been a strong runner. Her high school college cross-country running team was undefeated and she ran on a scholarship.

I have never been much or a runner due to my weight and lack of fitness. The one exception to that was in high school when I actually started to enjoy running in PE class. Now that I have lost over 30 pounds I am able to enjoy running again.

Last week Penelope and I ran around Not a Cornfield. It felt great. Later in the week we ran from out loft up to the top of bunker hill and the Disney hall. To take a break from running we hiked Chantry Flats on Sunday.

The hike ended up being a fairly challenging six mile loop. The abundance of steep climbs and descents made it a good workout. Now that we're in better shape we powered through the whole hike without stopping.

Someday soon my goal is to run Chantry Flats, now that will be a workout!

Downtown Los Angeles and Clouds

Downtown Los Angeles as seen from a parking lot in an industrial area east of the LA River in this file photo from 2007.

Read more...

Friday, June 27th, 2008

Blog Posts

Jott: Free Phone Based Transcription Service

Jott is a free transcription service that makes sending notes and reminders a phone call away. I signed up for their free service and verified my phone number a few months ago. All I have to do is call a toll-free number form my cell and talk. A few minutes later a full transcription of what I said is waiting in my inbox.

It helps to speak slowly and spell out any hard to understand or uncommon words. Jott doesn't use voice recognition software for the transcription, they have people doing the work. Due to that fact I don't use Jott for anything sensitive or secret.

I use Jott almost every day on my drive home from work. Writing while driving is somewhat inconvenient not to mention dangerous. I have Jott in my phone favorites and when I have an idea I just call the number and leave a message.

I also use Jott to message contacts in my address book. When I call in they ask me who I want to Jott. The message ends up being transcribed, then emailed and sms'ed to the contact.

Jott is a service that I have really learned to love. It is one of those rare things in life that are free and awesome. If it becomes a for-pay service I will still use it. Now that's a sign of a good thing.

52781 Sculpture

A sculpture consisting of outdated telephone switch parts adorns the wall of the AT&T building in Downtown Los Angeles in this file photo from 2007. Modern day telephone systems use computers instead of physical switching relays.

Read more...

Thursday, June 26th, 2008

Blog Posts

Getting Things Done and How It Changed My Life

Getting Things Done (GTD) literally changed my life 3 years ago. Growing up I had always been highly unorganized. After reading about GTD on the internet I ordered the book by David Allen and instantly started to change the way I worked.

GTD offers a pretty simple theory for organization: Collect every task and action you have in one trusted place. Instead of the dozens of lists I had spread throughout my computer for various projects, I funneled them all into several lists in one place. I collected every little nagging task my head and put them in those same lists.

Having all my actions in one place allowed me to easily keep track and review what I had to do. This simple change completely altered the way that I worked. I am now extremely productive and I love it.

A few weeks ago I reread GTD and implemented a number of things I had not done before. I created an orderly physical filing system for all my important papers. When I first started using GTD I tricked myself into thinking that I did everything on my computer. Once my filing system was setup I saw that was hardly the truth.

After creating my filing system I set up what David Allen calls a tickler file. A tickler file is a series of 43 folders, one for each month and 31 for each possible day of the month. When I have a physical item that requires my future attention I put it into either the month folder that it pertains to or the day if it happens to be in within the next 30 days. Every morning I check my tickler file to see if any paperwork is waiting for me.

Getting Things Done has change my life for the better. There is no way I could have accomplished what I have in the last 3 years without it. Thanks to GTD, I can finally say I truly am organized. Being organized is awesome.

Route 66 and Clouds

Route 66 stretches out into the desert near Ludlow in this photo I took after a Desert Explorers Rendezvous in 2007.

Read more...

Photos

Wednesday, June 25th, 2008

Blog Posts

Drive Slow, Save Gas

With fuel prices higher than ever, I've been driving 55 mph on the freeway to improve my gas mileage. For years I have always been one of those speed limit plus ten people. Only recently have I decided to slow down and take it easy.

My FJ Cruiser (below) normally gets around 15 mpg on the highway. I found out that if I keep the rpms below 2,000 my mileage increases to over 20 mpg. On roughly level ground that ends up being 55 mph in sixth gear.

I keep an eye on my gas mileage using my ScanGauge II. It's a handy little device that plugs into the FJ's ODBII port and gives information about everything from intake temperature to battery voltage. The ScanGauge allows to me see exactly how many miles I am getting to the gallon at any given moment as well as the average for the whole tank.

So far driving 55 on the Los Angeles freeways has been fun and cost effective. The funniest thing about driving in the slow lane is that people still tailgate!

FJ Cruiser and New Mexico Sky

My FJ Cruiser near Madrid, during our trip to New Mexico last near.

Read more...

accessories
accessories
urban
urban
outdoor
outdoor
crowd
crowd
outdoors
outdoors
sky
sky
building
building
electronics
electronics
hat
hat
part
part
architecture
architecture
lighting
lighting
art
art
nature
nature
concert
concert
plant
plant
night
night
coachella
coachella
glasses
glasses
land
land
recreation
recreation
footwear
footwear
shoe
shoe
photography
photography
jewelry
jewelry
indoors
indoors
furniture
furniture
performance
performance
vehicle
vehicle
light
light
transportation
transportation
machine
machine
city
city
portrait
portrait
device
device
club
club
electrical
electrical
blue
blue
room
room
stage
stage
animal
animal
rekognition c
rekognition c
bag
bag
life
life
interior
interior
microphone
microphone
audience
audience
handbag
handbag
rock
rock
car
car
cap
cap
metropolis
metropolis
computer
computer
music
music
road
road
musical
musical
performer
performer
instrument
instrument
headgear
headgear
activities
activities
leisure
leisure
baseball
baseball
tree
tree
shirt
shirt
hardware
hardware
necklace
necklace
wood
wood
water
water
entertainer
entertainer
pants
pants
cloudy
cloudy
wristwatch
wristwatch
table
table
screen
screen
coat
coat
chair
chair
grass
grass
fun
fun
monitor
monitor
mammal
mammal
musician
musician
bracelet
bracelet
floor
floor
party
party
arts
arts
speaker
speaker
performing
performing
flooring
flooring
baby
baby
flare
flare
pub
pub
cup
cup
pet
pet
food
food
scenery
scenery
path
path
housing
housing
jeans
jeans
wheel
wheel
spotlight
spotlight
junglescene
junglescene
beverage
beverage
couch
couch
weekend
weekend
design
design
jacket
jacket
plywood
plywood
office
office
alcohol
alcohol
child
child
flower
flower
nightclub
nightclub
container
container
canine
canine
boy
boy
hill
hill
dog
dog
cord
cord
darkness
darkness
summer
summer
pc
pc
area
area
street
street
park
park
laptop
laptop
happy
happy
glove
glove
equipment
equipment
cityscape
cityscape
desk
desk
shelter
shelter
landscape
landscape
singer
singer
sport
sport
wear
wear
formal
formal
phone
phone
sea
sea
smile
smile
guitar
guitar